티스토리 뷰
R2DBC를 사용해보자 (3) - Join (Many-To-One, One-To-One, One-To-Many)
KimDoubleB 2022. 8. 15. 14:52이번 글에서 R2DBC, Spring data r2dbc를 사용해 Join을 다뤄보자.
- 학습 기록용. 피드백은 언제나 환영입니다.
- 사용한 모든 예제코드는 github을 참고해주세요.
이전 글
R2DBC를 사용해보자 (1) - 왜 사용할까?
이번 글에서 R2DBC란 무엇이고, 왜 사용하고, 어떻게 사용했는지 경험에 대해 이야기해보고자 한다. 잘못된 내용이 있으면 피드백은 언제든지 환영입니다 :) R2DBC는 언제 사용할까? Reactive Programming
binux.tistory.com
R2DBC를 사용해보자 (2) - CRUD를 만들어보자
이번 글에서는 R2DBC, Spring data r2dbc를 사용해 코드를 작성해보자. 잘못된 내용이 있으면 피드백은 언제든지 환영입니다 :) 사용한 모든 예제코드는 github을 참고해주세요. 이전 글 R2DBC를 사용해보
binux.tistory.com
Many-To-One
먼저 Many-To-One 관계(다대일)에서 Join을 사용해 관계된 데이터를 함께 조회해보자.
즉, 예제 데이터베이스에서 Post를 가져올 때, author 정보도 같이 가져와보자.
또한, 가져오면서 Entity class가 아닌 Projection을 통해 DTO 클래스로 바로 받아보게끔 코드를 작성했다.
먼저 Projection class를 생성한다. JDK 17을 사용하다보니 record를 사용했다.
@Builder
public record PostUserSpecificInfo(Long postId, String title, String content, LocalDateTime postCreatedAt,
                                   Long authorId, String authorName, Integer authorAge) {
}
Join SQL을 작성해 DatabaseClient에서 활용한다. 이전 예제에서 사용했듯, 같은 방식으로 가져온 데이터를 매핑할 수 있다. SQL에서 Join 부분만 달라졌을 뿐 똑같다.
public Flux<PostUserSpecificInfo> findAllWithAuthor() {
    var sqlJoinUser = """
                SELECT  p.id as postId,
                        p.title as postTitle,
                        p.content as postContent,
                        p.created_at as postCreatedAt,
                        u.id as authorId,
                        u.name as authorName,
                        u.age as authorAge
                FROM post p
                INNER JOIN user u
                ON p.author_id = u.id
            """;

    return databaseClient.sql(sqlJoinUser)
                   .fetch().all()
                   .map(row -> PostUserSpecificInfo.builder()
                                       .postId((Long) row.get("postId"))
                                       .title((String) row.get("postTitle"))
                                       .content((String) row.get("postContent"))
                                       .postCreatedAt((LocalDateTime) row.get("postCreatedAt"))
                                       .authorId((Long) row.get("authorId"))
                                       .authorName((String) row.get("authorName"))
                                       .authorAge((Integer) row.get("authorAge"))
                                       .build());
}
또한, Post Entity class를 따로 생성하지 않고 바로 PostUserSpecificInfo 인스턴스로 매핑해 반환하는 것을 확인할 수 있다. 이렇게 원하는 Projection class로 바로 매핑 후 반환이 가능하다.
근데 왜 SQL에서 as로 결과의 모든 필드명을 따로 설정해준 것일까?
그 이유는 중복된 필드명이 있을 경우, 따로 prefix가 붙는게 아닌 무시가 되기 때문이다.
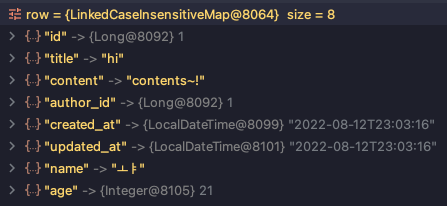
위 예시를 들자면 post 테이블에도 id가 있고, user 테이블에도 id가 있다. 이런 경우, 아래 SQL과 사진처럼 as 없이 Query를 전송하면 user의 id는 무시되어 결과에 포함되지 않는다.
SELECT *
FROM post p
INNER JOIN user u
ON p.author_id = u.id
즉, user id는 매핑할 수가 없는 문제가 생긴다. 이를 해결하기 위해 적어도 Join 하는 테이블 간 필드명이 같은 필드의 경우 as 를 통해 필드명을 unique하게 설정해줘야 한다.
Converter 사용하기
거의 모든 로직에서 연관된 필드까지 필요한 경우, 매번 이렇게 매핑 해주도록 작성하는 것은 힘들 수가 있다. 이럴 때는 spring data에서 제공하는 Converter를 사용할 수 있다.
WritingConverter: Java Entity class to Database rowReadingConverter: Database row to Java Entity class
우리는 현재 Read에서 매핑이 필요한 경우로 ReadingConverter를 구현해주면 된다.
먼저 예시를 위해 Post class에서 User class를 참조할 수 있도록 @Transient를 통해 필드를 추가해준다.
// Post entity class
@Table("post")
@Getter
@Builder
@AllArgsConstructor
@NoArgsConstructor
public class Post {

    @Id
    private Long id;

    private String title;

    private String content;

    private Long authorId;

    @CreatedDate
    private LocalDateTime createdAt;

    @LastModifiedDate
    private LocalDateTime updatedAt;

    @Transient
    private User author;

}

// User entity class
@Table("user")
@Getter
@Builder
@AllArgsConstructor
@NoArgsConstructor
public class User {

    @Id
    private Long id;

    private String name;

    private Integer age;

    @CreatedDate
    private LocalDateTime createdAt;

    @LastModifiedDate
    private LocalDateTime updatedAt;

    @Transient
    private List<Post> posts;

}
Post 조회 시, User도 가져올 수 있도록 ReadingConverter를 구현해준다.
@ReadingConverter
public class PostReadConverter implements Converter<Row, Post> {

    @Override
    public Post convert(Row source) {
        var user = User.builder()
                           .id((Long) source.get("authorId"))
                           .name((String) source.get("authorName"))
                           .age((Integer) source.get("authorAge"))
                           .build();
        return Post.builder()
                       .id((Long) source.get("postId"))
                       .title((String) source.get("postTitle"))
                       .content((String) source.get("postContent"))
                       .createdAt((LocalDateTime) source.get("postCreatedAt"))
                       .authorId(((Long) source.get("authorId")))
                       .author(user)
                       .build();
    }

}
해당 Custom ReadingConverter를 Bean으로 등록해준다. 앞서 작성했던 R2dbcConfig에 추가해주었다.
R2dbcCustomConversions클래스로 Custom converter를 생성자로 전달해 만들어주고, Bean으로 등록한다.
@Configuration
@EnableR2dbcAuditing
public class R2dbcConfig {

    @Bean
    public R2dbcCustomConversions r2dbcCustomConversions(DatabaseClient databaseClient) {
        var dialect = DialectResolver.getDialect(databaseClient.getConnectionFactory());
        var converters = new ArrayList<>(dialect.getConverters());
        converters.addAll(R2dbcCustomConversions.STORE_CONVERTERS);

        return new R2dbcCustomConversions(
                CustomConversions.StoreConversions.of(dialect.getSimpleTypeHolder(), converters),
                getCustomConverters());
    }

      // 추가하고 싶은 Converter collection 반환
    private List<Object> getCustomConverters() {
        return List.of(new PostReadConverter());
    }

}
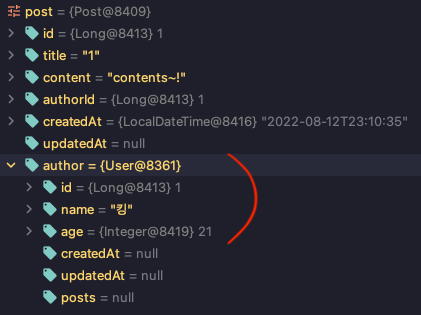
그럼 위에서 직접 Custom하게 매핑할 필요 없이 Converter가 활용되어, Query annotation으로도 매핑이 자동으로 진행된다. 즉, Post 조회에도 User 정보까지 함께 조회할 수 있다.
public interface PostRepository extends R2dbcRepository<Post, Long> {

      ...

    @Query("""
                SELECT  p.id as postId,
                        p.title as postTitle,
                        p.content as postContent,
                        p.created_at as postCreatedAt,
                        u.id as authorId,
                        u.name as authorName,
                        u.age as authorAge
                FROM post p
                INNER JOIN user u
                ON p.author_id = u.id
            """)
    Flux<Post> findAllWithAuthorUsingQuery();

}

- 사진에서 볼 수 있듯 Converter에서 매핑한 정보만 들어가 있는 것을 확인할 수 있다.
One-To-One
One-To-One 관계를 다루는 것은 Many-To-One 관계를 다뤘던 것과 동일하다. 똑같이 Join Query 후 매핑을 진행하면 된다.
One-To-Many
이제 One-To-Many를 다뤄보자. One-To-Many도 DatabaseClient를 사용한다. 조금 다른 점이 있다면, 하나의 Entity class 인스턴스에 Collection 타입으로 연관된 데이터들이 들어가야 한다는 것에 있다.
예제로 Author를 조회할 때 연결된 Post 리스트도 같이 조회할 수 있도록 해보자.
User entity class는 다음과 같다. 위 예제에서 잠시 등장했었는데 똑같은 형태이다.
@Table("user")
@Getter
@Builder
@AllArgsConstructor
@NoArgsConstructor
public class User {

    @Id
    private Long id;

    private String name;

    private Integer age;

    @CreatedDate
    private LocalDateTime createdAt;

    @LastModifiedDate
    private LocalDateTime updatedAt;

    @Transient // (1)
    private List<Post> posts;

}
(1): Transient annotation
Transientannotation은 Table Column에서 제외하게 되어 Table에 반영되지 않고 현재 Application 내에서만 활용될 수 있는 필드이다.- Relational Mapping이 불가능하므로 연결된 객체들을 Trasient field로 관리할 수 있게 구성한다.
이에 대한 CustomRepository를 만들고, 그 구현체를 작성하자.
앞서 이야기했듯 DatabaseClient를 이용해 SQL을 직접 작성한다. 먼저 코드를 보자.
@RequiredArgsConstructor
public class UserCustomRepositoryImpl implements UserCustomRepository {

    private static final String USER_ID_FIELD_NAME = "userId";

    private final DatabaseClient databaseClient;

    @Override
    public Flux<User> findAllWithPosts() {
        var sqlWithPost = """
                SELECT
                    u.id as userId, u.name as userName, u.age as userAge,
                    u.created_at as userCreatedAt, u.updated_at as userUpdatedAt,
                    p.id as postId, p.title as postTitle, p.content as postContent,
                    p.created_at as postCreatedAt, p.updated_at as postUpdatedAt
                FROM user u
                INNER JOIN post p
                ON u.id = p.author_id
                """;

        return databaseClient.sql(sqlWithPost)
                       .fetch().all()
                       .sort(Comparator.comparing(result -> (Long) result.get(USER_ID_FIELD_NAME))) // (1)
                       .bufferUntilChanged(result -> result.get(USER_ID_FIELD_NAME)) // (2)
                       .map(result -> {
                           var posts = result.stream()
                                               .map(row -> Post.builder()
                                                                   .id((Long) row.get("postId"))
                                                                   .title((String) row.get("postTitle"))
                                                                   .content((String) row.get("postContent"))
                                                                   .createdAt((LocalDateTime) row.get("postCreatedAt"))
                                                                   .updatedAt((LocalDateTime) row.get("postCreatedAt"))
                                                                   .build())
                                               .toList();
                           var row = result.get(0);
                           return User.builder()
                                          .id((Long) row.get(USER_ID_FIELD_NAME))
                                          .name((String) row.get("userName"))
                                          .age((Integer) row.get("userAge"))
                                          .createdAt((LocalDateTime) row.get("userCreatedAt"))
                                          .updatedAt((LocalDateTime) row.get("userUpdatedAt"))
                                          .posts(posts)
                                          .build();
                       });
    }

}
코드를 보면 알 수 있듯 이전 Many-To-One 관계와 비슷하게 row를 가져와 Entity class로 매핑하고 있다.
기존(Many-To-One 관계) 방식과 다른 점이라면 2가지(코드의 (1), (2))가 있다. 이해를 쉽게 하기 위해 (2)번 부터 살펴보자.
(2): bufferUntilChanged(result -> result.get(USER_ID_FIELD_NAME))
앞서 이야기했듯 One-To-Many 관계에서는 하나의 Entity class 인스턴스에 Collection 타입으로 연관된 데이터들이 들어가야 한다.
하지만 이 말은 코드 상의 객체에서 바라보는 입장이고, 사실 SQL을 통해 결과를 도출하면 중복된 값들(빨간색 박스)과 Join 된 각기 다른 값들(노란색 박스)이 존재할 것이다.

결국 이러한 값들을 코드에서 읽어왔을 때, 빨간색 박스 부분의 row를 하나의 묶음으로 받아 하나의 Entity class 인스턴스에 노란색 박스의 row 데이터들을 Collection 타입으로 넣을 수 있다. 이 프로세스를 위해 사용된 코드가 bufferUntilChanged 인 것이다.
bufferUntilChanged는 R2dbc, Spring-data-r2dbc에서 제공하는 것이 아닌 Reactor Flux에서 제공되는 메서드일 뿐이다. (공식문서)
결국 예제로 설명하면 한 user가 작성한 post들을 Post entity class 인스턴스의 List collection으로 만들었고, 이를 User entity class 인스턴스의 posts 필드 값으로 설정해주었다.
var posts = result.stream()
                   .map(row -> Post.builder()
                                       .id((Long) row.get("postId"))
                                       .title((String) row.get("postTitle"))
                                       .content((String) row.get("postContent"))
                                       .createdAt((LocalDateTime) row.get("postCreatedAt"))
                                       .updatedAt((LocalDateTime) row.get("postCreatedAt"))
                                       .build())
                   .toList();
(1): sort(Comparator.comparing(result -> (Long) result.get(USER_ID_FIELD_NAME)))
정렬 조건은 따로 없었는데, 왜 하고 있는 것일까?
그건 바로 앞서 설명한 (2)번에서 필요하기 때문이다. 정렬을 하지 않은 상태라면 아래 그림처럼 Query 결과가 나오게 된다.

이 상황에서 (2)의 bufferUntilChanged를 사용하면 어떻게 될까?
빨간색 박스에 row들이 함께 묶여 노란색 박스 row들이 하나의 list collection으로 구성되어야 하는데, 그렇게 되지 않는다.
bufferUntilChanged는 마블 다이어그램에서 볼 수 있듯, reactive 파이프라인에서 들어오는 데이터들에서 변화가 있을 때까지 묶어 반환하는 메서드이기 때문이다.
결국, 빨간색 박스 row들은 하나로 묶이지 않게 될 것이다. 이를 위해 sort를 사용해 빨간색 박스 row들이 묶을 수 있도록 했다.
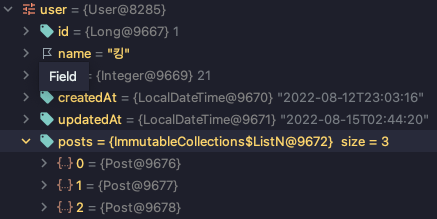
이렇게 One-To-Many 관계를 구성할 수 있고, 이렇게 만든 메서드를 통해 user를 조회하면 연결된 post도 함께 가져올 수 있다.

References
Spring Data R2DBC - Reference Documentation
The term, “reactive”, refers to programming models that are built around reacting to change, availability, and processability -— network components reacting to I/O events, UI controllers reacting to mouse events, resources being made available, a
docs.spring.io
Handle R2dbc in Spring Projects
In this article, we will deepen what is Reactive programming, the place R2DBC specification takes in it and how developers can handle it in spring projects
www.sipios.com
'Development > Java, Kotlin, Frameworks' 카테고리의 다른 글
| Spring boot, JPA 환경에서의 더 좋은 쿼리 로깅 하기 (0) | 2022.11.21 |
|---|---|
| DAO, DTO, PO, SO, BO, VO (2) | 2022.11.11 |
| R2DBC를 사용해보자 (2) - CRUD를 만들어보자 (0) | 2022.08.15 |
| R2DBC를 사용해보자 (1) - 왜 사용할까? (0) | 2022.08.15 |
| ThreadLocal 사용 시, remove를 잊지 맙시다 (0) | 2022.07.06 |
- Total
- Today
- Yesterday
- container
- Istio
- 쿠버네티스
- k8s
- tag
- 로그
- Spring boot
- 클린 아키텍처
- boj
- 일상
- WebFlux
- HTTP
- OpenTelemetry
- MySQL
- Kubernetes
- Intellij
- gradle
- 백준
- 알고리즘
- 하루
- java
- c++
- Algorithm
- Log
- python
- docker
- jasync
- Clean Architecture
- 비동기
- Spring
| 일 | 월 | 화 | 수 | 목 | 금 | 토 |
|---|---|---|---|---|---|---|
| 1 | 2 | 3 | 4 | 5 | 6 | 7 |
| 8 | 9 | 10 | 11 | 12 | 13 | 14 |
| 15 | 16 | 17 | 18 | 19 | 20 | 21 |
| 22 | 23 | 24 | 25 | 26 | 27 | 28 |
